 |
Artists & Gilders Decorative Studio
Ross O'Neal Inc.
PA#015224
 |
Marbling Tip
Artists & Gilders Decorative Studio Inc. teaches us how to take the mystery out of faux finishing. Marble finishes are all the rage and actually, not that difficult to achieve. Marbling can be done on plates, gift boxes, plaques, furniture, trim, floors, but keep in mind it should be used in places and situations where we find real marble for the best effects. Here Ross shares his technique for Greek Rose Marble.
|
What you will need:
Ordinary stain blocking primer
Some Soft Rags
Palette- 3 small dishes will do
Container of water
Container for glaze
Flat lettering brush, fine pointed long haired brush and a small round brush
Wipe-out tool
Badger Blender
Satin or gloss acrylic varnish or polyurethane
Rubber gloves if you feel they are necessary
Glaze is made from artist acrylic's and water
|
How to do it:
1. Prime the surface of the item using primer.
2.Drag and dab the sponge over the surface to give the background texture. Add some of the palette colors to make some areas stronger.Smooth with blender when completed. This will dry quick because it's water base.
3. Repeat the process with a darker mix of the colors. Apply more random so some of the 1st layer shows through. Let dry.
4. Mix the red oxide; a little burnt sienna, vermillion and chrome orange and a little water. Make enough for the entire project. Paint over area, leaving some areas uncovered, go back over other areas again to add more depth. With wipeout tool you can cut through glaze to expose base in some areas.
5. Make a very transparent glaze of burnt umber and water. Sponge over red areas mainly this is to add texture to the red area. Now mix a darker glaze of burnt umber and a little black.
6. Mix an opaque glaze of white plus a touch of black, ultramarine blue and raw umber, glaze should be a light gray-white color.Apply over entire surface with the corner of the worn sponge lightly. Set aside for use later. With the long haired fine pointed brush, add light veining in raw umber, make wavy breccia lines in all directions some crossing others
7. Add white to lighten gray white glaze from above, with the pointed brush outline one side of most of the gray shapes to create a shadow and add depth.
8. With the round brush outline some gray areas with white glaze with a touch of yellow ochre. With the fine pointed brush add veins in broken stepped lines of various sizes across surfaces seen on the sample. Once varnished the surface takes on the sheen of marble.
|
Colors:
For the base glaze we use
6 parts titanium white
2 parts raw umber
2 parts ultramarine blue
dash of black
Red Glaze:
Red oxide plus a little
vermillion, burnt sienna
chrome orange
Palette colors:
white ,black, burnt umber
raw umber, ultramarine blue
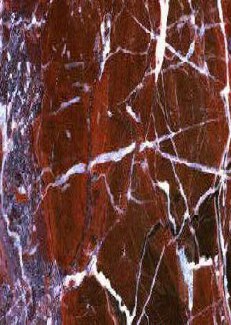
Greek Red Marble
|
Tips for Veining
Variety is the key here with veining, give each vein its own character by changing their width and color depth . All this can be controlled with the pressure and the color strength on the brush. Think about the marble you are reproducing as you work you want to capture the fragmented look of the marble. Veins should be like small fragments they should tremble slightly. They should not be straight or look like crows feet or snake tongues.
|